
Recipes
Setting up, creating, managing, viewing and sharing
Recipes are at the heart of Chef Notepad. This guide takes you through everything in the order you will use it: setting up your preferences and targets, creating a recipe step by step, managing your recipes from the dashboard, and then viewing, scaling, printing and sharing them with your team.
Setting up your recipe preferences
2 min read
Before you build your first recipe, it is worth taking a minute to set your recipe preferences. These settings shape what you see on every recipe, such as which cost figure is shown and whether your food cost turns green or red, so you only need to set them once, up front.
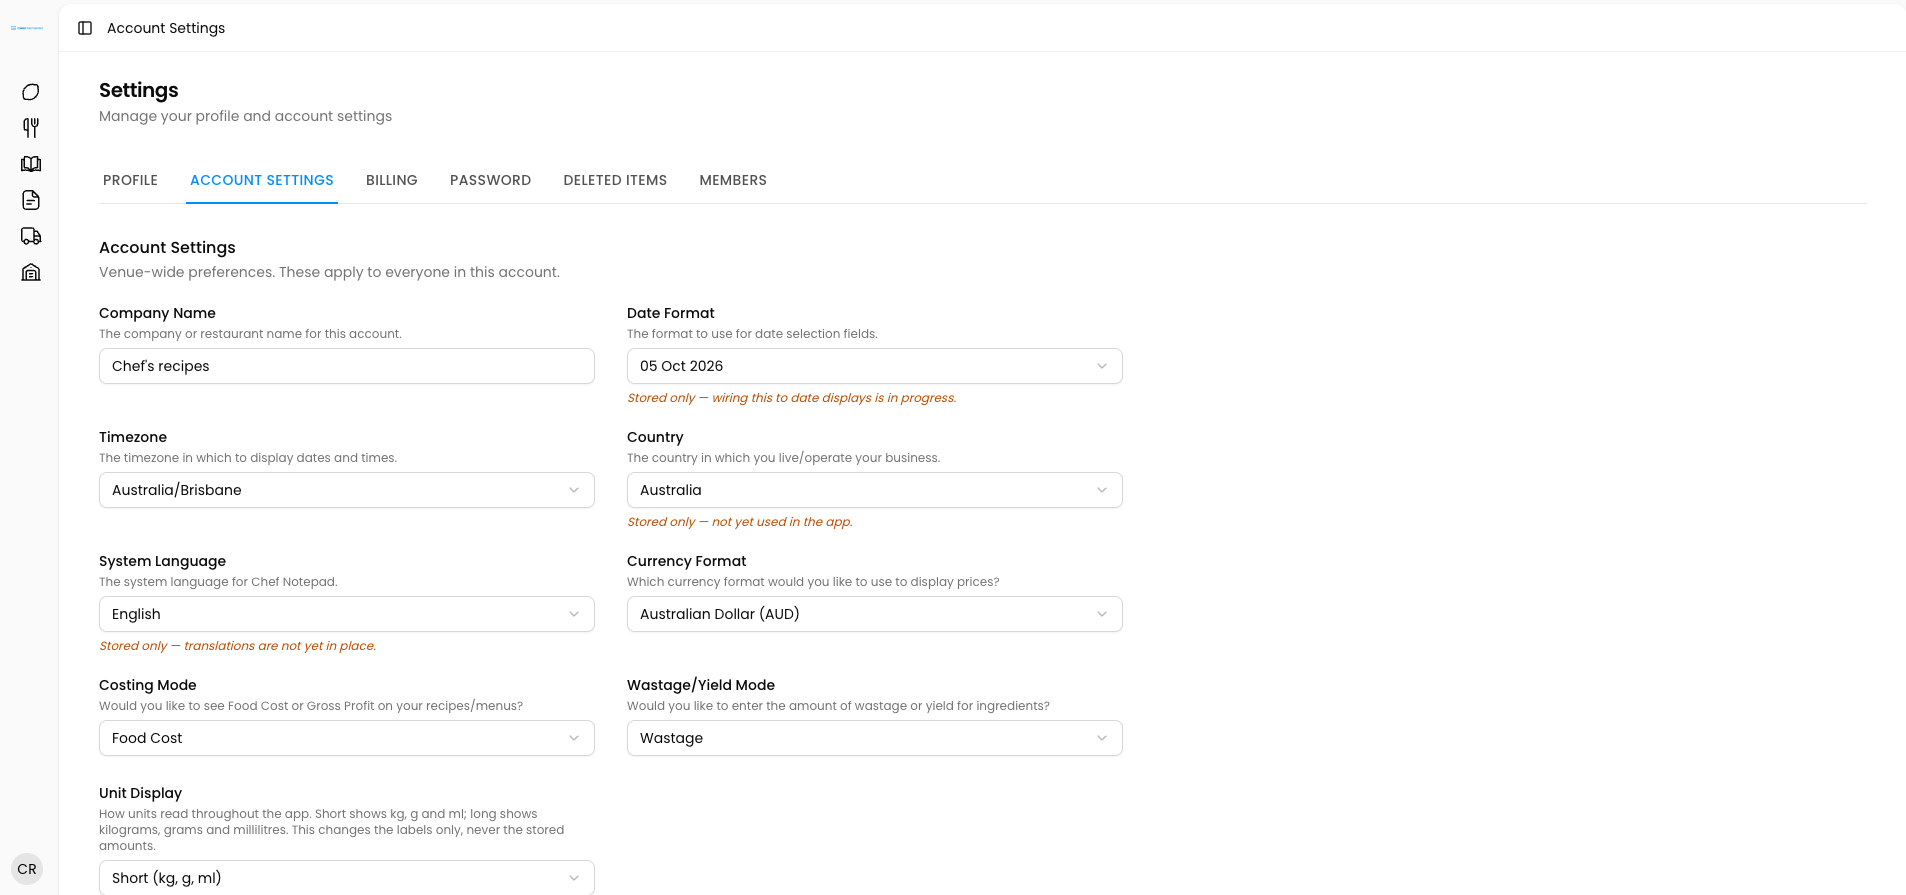
1. Open your account settings. Go to Settings, then Account Settings, and scroll to the bottom.
2. Choose the options you need. Each one is explained below.
• Costing mode: choose food cost or gross profit. This decides which figure is shown on your recipes.
• Wastage or yield: choose whether to see wastage, which shows what is lost from an ingredient, or yield, which shows what you actually get to use.
• Unit display: choose how units appear when you enter ingredients and build recipes.
• Recipe tax: turn this on and enter a percentage, for example 10%, to account for government tax or a card surcharge.
• Food cost target: enter the food cost percentage you aim for, for example 28%. A recipe at or below your target shows in green, slightly over shows in orange, and well over shows in red, so you can spot problem recipes at a glance.
• Custom fee: add a fee for platforms that take a commission, for example Uber Eats at 33%, so you can see what you really keep on those sales.
When you are happy with your choices, click Save.
Next: Learn how to Creating a recipe, Adding ingredients to a recipe, When an ingredient in your recipe has been deleted, Navigating the recipe dashboard, and Scaling, printing, exporting, sharing a recipe
Creating a recipe
2 min read
Here is how to build a recipe from scratch, with its ingredients, photo and method, so Chef Notepad can calculate your food cost automatically. There are five steps, and you can come back to any of them later.
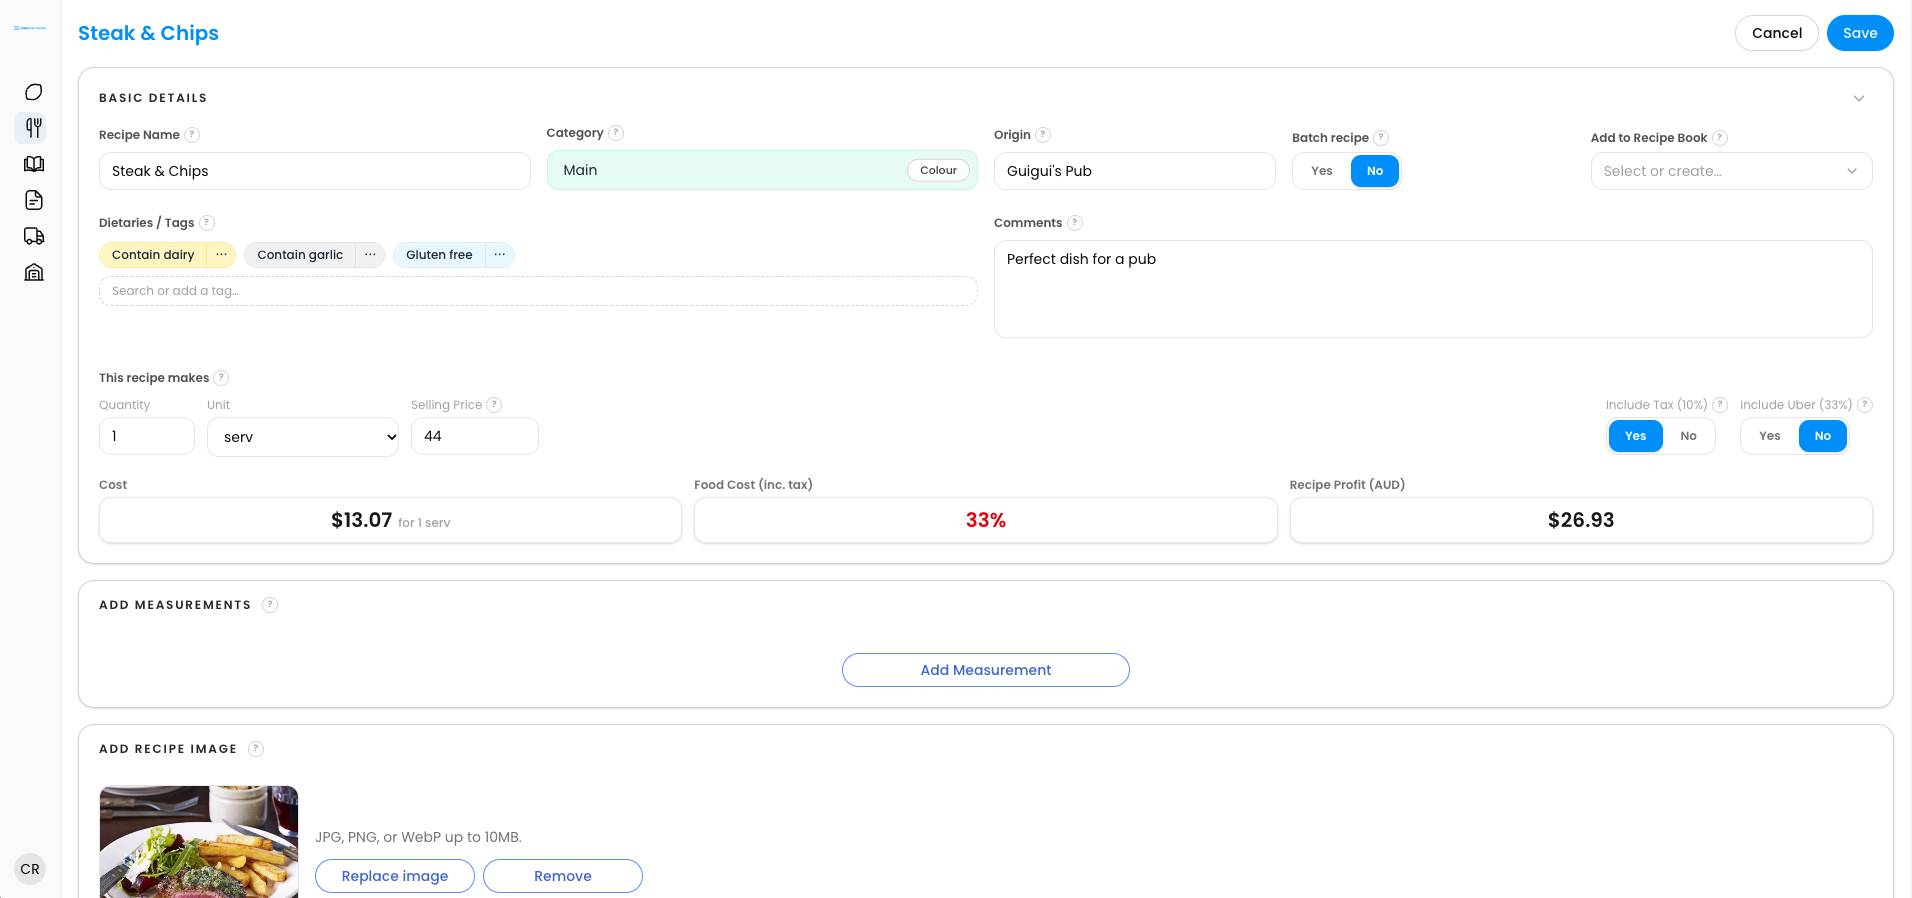
Step 1: Recipe information
1. Open the Recipes section. From the menu on the left-hand side, click Recipes, then click Create Recipe.
2. Name your recipe. For example, Beef Burger.
3. Choose a category. For example, Main. You can also pick a colour for the category, which makes your recipe list easier to scan.
4. Add the origin. This is where the recipe comes from, for example your restaurant’s name.
5. Tick Batch recipe if it will be used inside other recipes. For example, a secret sauce is a batch recipe, because you will use it in your burgers. The burger itself is not.
6. Tick Add to recipe book if you want to file it. This adds the recipe to one of your recipe books.
7. Add dietaries and tags. Choose from the list or create your own, for example gluten-free or lactose-free. Tags make recipes easier to find and filter later.
8. Add any comments. For example, good all year round, or seasonal.
9. Set the recipe mix. Enter the quantity and unit this recipe makes, for example 1 portion, then enter your selling price, for example $28.
10. Choose whether to include tax. Select yes or no.
11. Choose whether to include a platform commission. If you select yes, you can enter a separate price for that platform, for example $35 on Uber Eats.
12. Save. Click Save.
Tip: clicking the three dots on a tag lets you change its colour or delete it, but deleting a tag removes it from every recipe. To remove a tag from just this recipe, hover over it and click the red cross instead.
Step 2: Add measurements (batch recipes)
Measurements let you use a batch recipe in other recipes in more than one way. For example, if your secret sauce makes 1.6 kg in total, you can tell Chef Notepad that 1 serve equals 50 g.
1. Add the measurement. In the measurements section, add your measurement, for example 1 serve = 50 g.
2. Save. Click Save.
You can now add the sauce to another recipe either by the gram or by the serve. Add as many measurements as you need.
Step 3: Add a recipe image
1. Choose your image. Click Choose File and select an image from your computer. It uploads automatically.
2. Change it later if you need to. Click Replace and choose a different file.
3. Remove it. Click Remove.
Tip: JPEG, PNG and WebP files all work, and larger images are compressed automatically, so there is no need to resize anything first.
Step 4: Add a method
1. Write your method. In the Add Method section, write your method using the text editor. You can use headings, bold, italic, links, and bulleted or numbered lists.
2. Save. Click Save.
Next: Learn how to Adding ingredients to a recipe, When an ingredient in your recipe has been deleted, Navigating the recipe dashboard, and Scaling, printing, exporting, sharing a recipe
Adding ingredients to a recipe
2 min read
This is where your recipe gets its cost. Every ingredient you add brings its price with it, and Chef Notepad adds it all up for you.
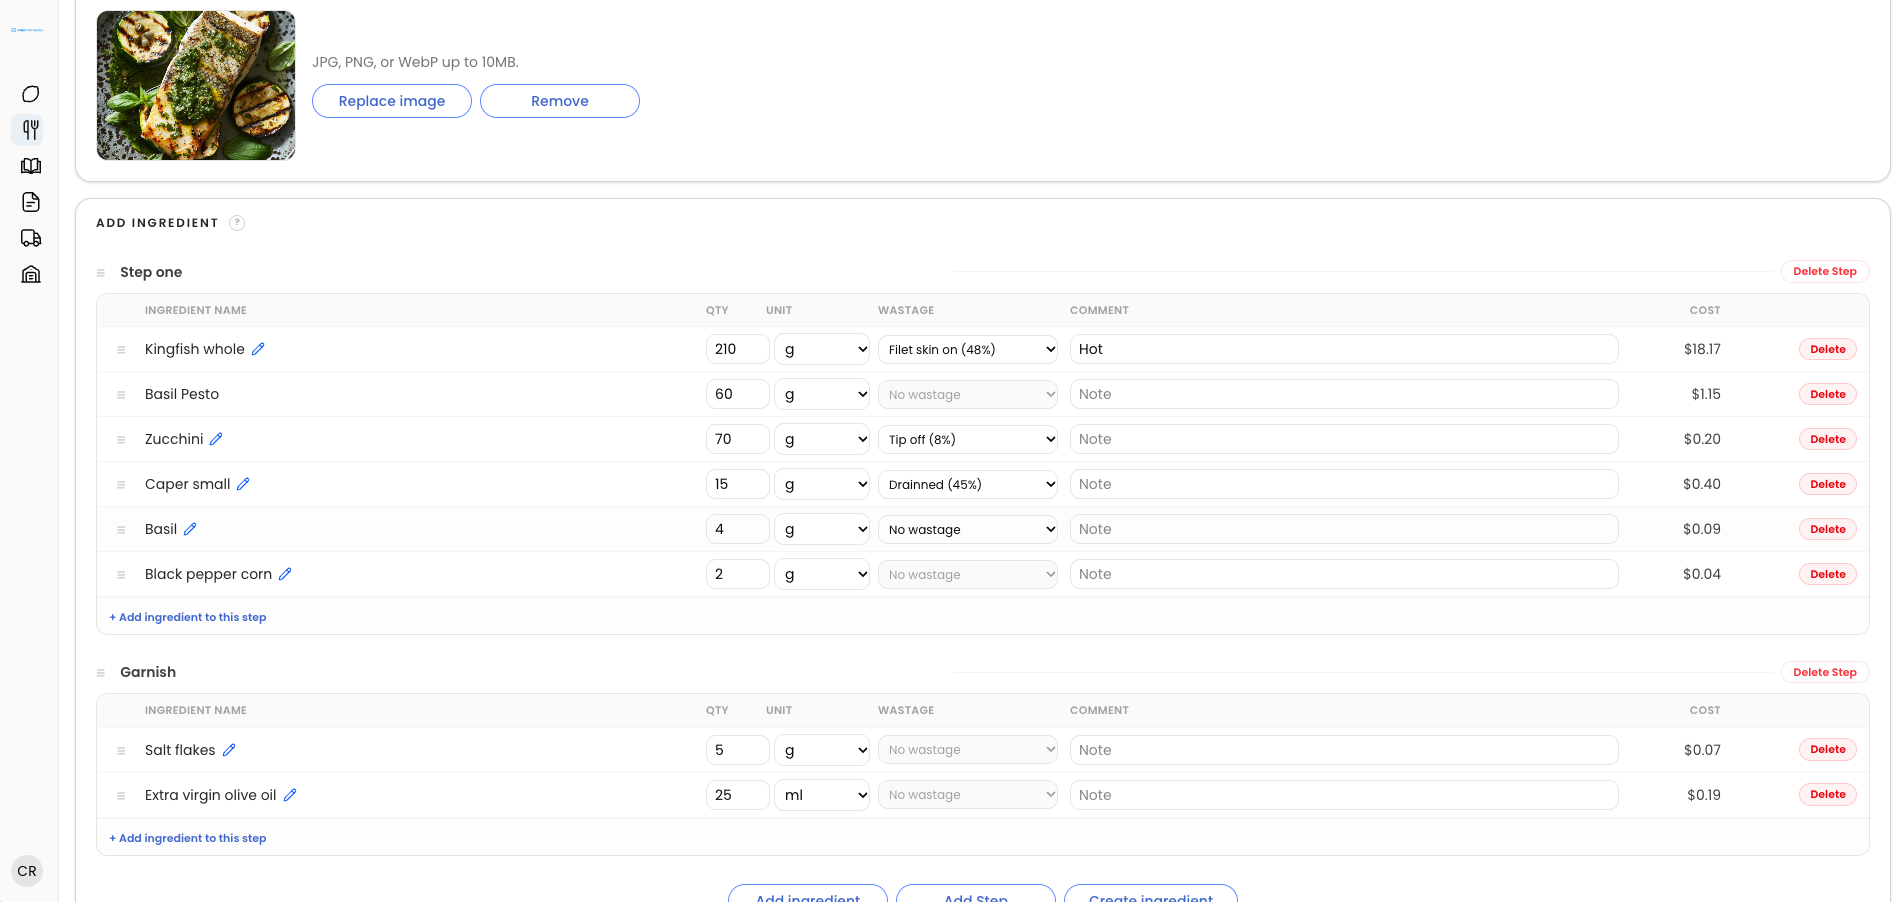
1. Add an ingredient. In the ingredients section, click Add Ingredient.
2. Search for it. Start typing to search your ingredients and batch recipes, then select the one you want, for example Lemon.
3. Enter the quantity and unit. For example, 200, then choose the unit. Units that are registered to that ingredient, such as kilogram, box, gram or piece, calculate a cost correctly.
4. Choose a wastage option if it applies. For example, juice or segment, or none.
5. Add a comment if you need one. For example, fresh or room temperature.
6. Click Add. The ingredient’s cost now shows in the recipe.
7. Repeat and save. Add each of your ingredients, then click Save.
If the cost shows “not available”: you have chosen a unit that is not registered to that ingredient, such as serve. Click the pencil icon next to the ingredient to open it, add the missing measurement, for example 120 g = 1 serve, and the cost will calculate.
Organising your ingredients
• Reorder: drag ingredients into a new order using the three bars on the left.
• Group with steps: add a step to group your ingredients, for example Dip and Garnish. You can rename or delete steps, and drag ingredients between them.
• Delete: remove an ingredient with the delete button on the right.
• Create a missing ingredient: if an ingredient does not exist yet, click Create Ingredient to add it in a pop-up, without leaving the recipe.
Step 5: Add a method
1. Write your method. In the Add Method section, write your method using the text editor. You can use headings, bold, italic, links, and bulleted or numbered lists.
2. Save. Click Save.
Next: Learn how to When an ingredient in your recipe has been deleted, Navigating the recipe dashboard, and Scaling, printing, exporting, sharing a recipe
When an ingredient in your recipe has been deleted
2 min read
If an ingredient used in a recipe is ever deleted, it does not quietly disappear. The recipe flags it as This ingredient has been deleted, so nothing is costed incorrectly without you noticing. You then have two options.
1. Replace it. Choose another ingredient in its place.
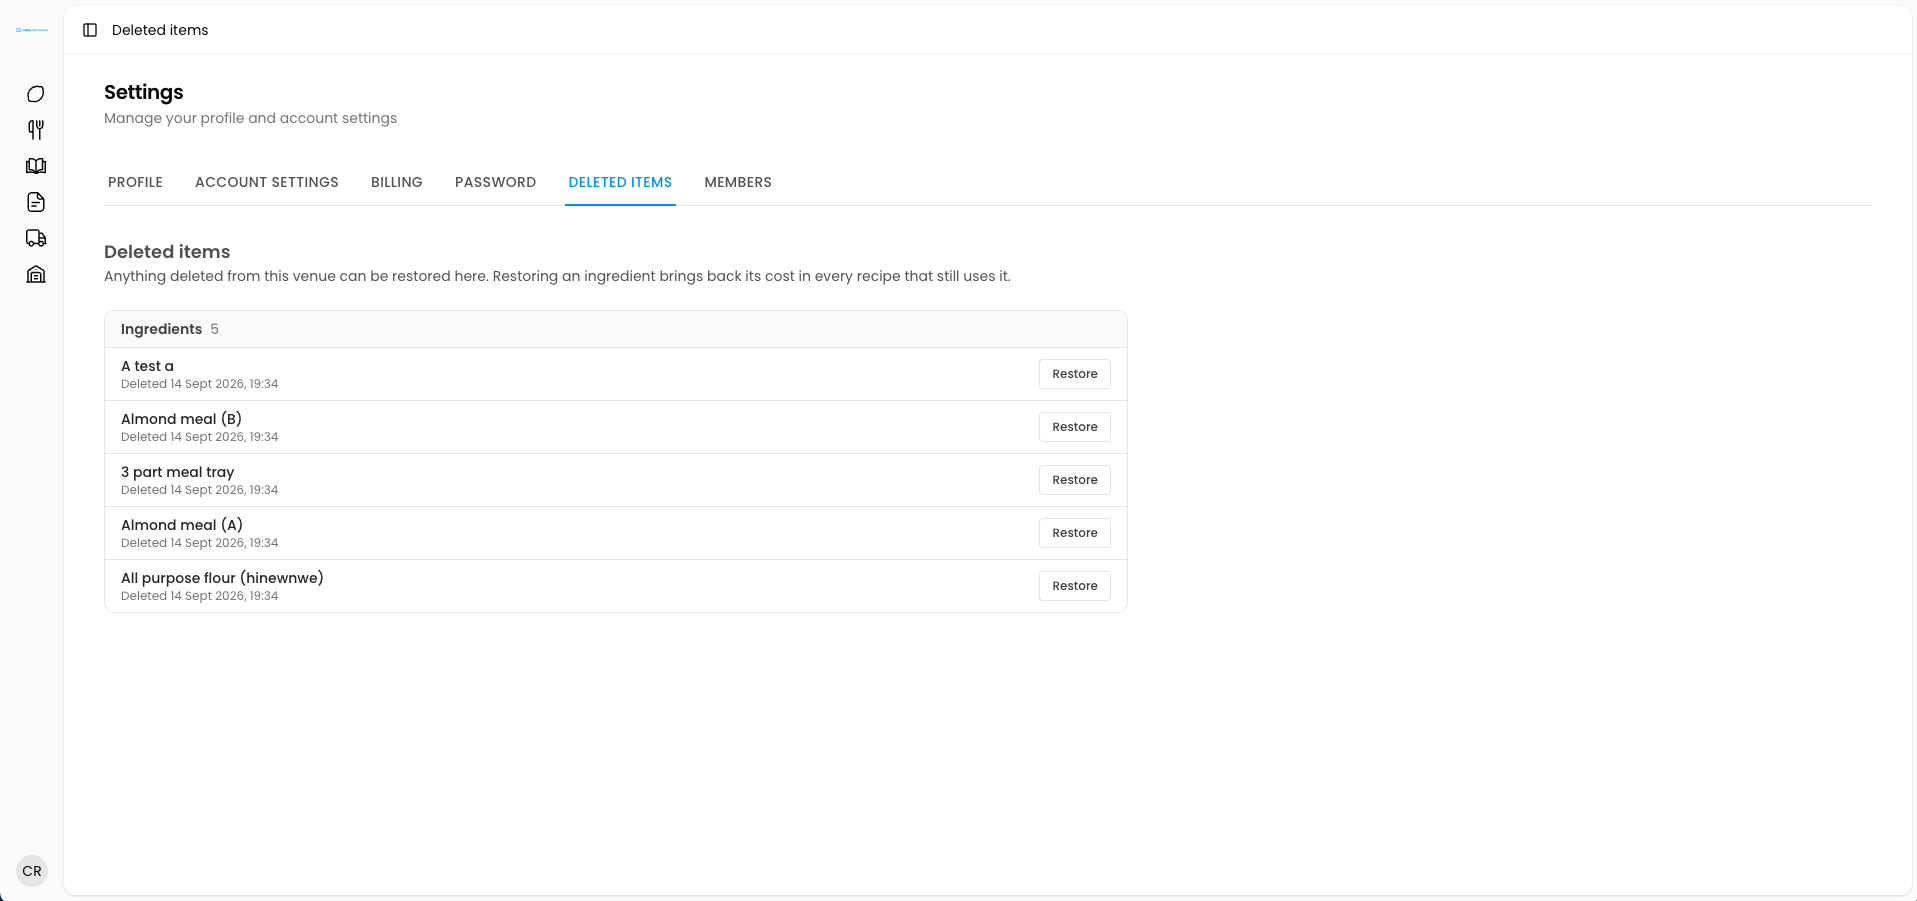
2. Or restore the original. Go to Settings, then Deleted Items, where you will see everything that has been deleted. Find the ingredient and click Revoke, and it is added straight back into your system.
This is especially handy if you delete an ingredient by accident. Say you remove your lemon and it is used in 25 different recipes. Instead of creating a new ingredient called lemon and replacing it in every recipe, you simply revoke the original once and every recipe is fixed.
Next: Learn how to Navigating the recipe dashboard, and Scaling, printing, exporting, sharing a recipe
Navigating the recipe dashboard
2 min read
The Recipe page gives you a full overview of every recipes, and you can customise the layout to suit the way you like to work.
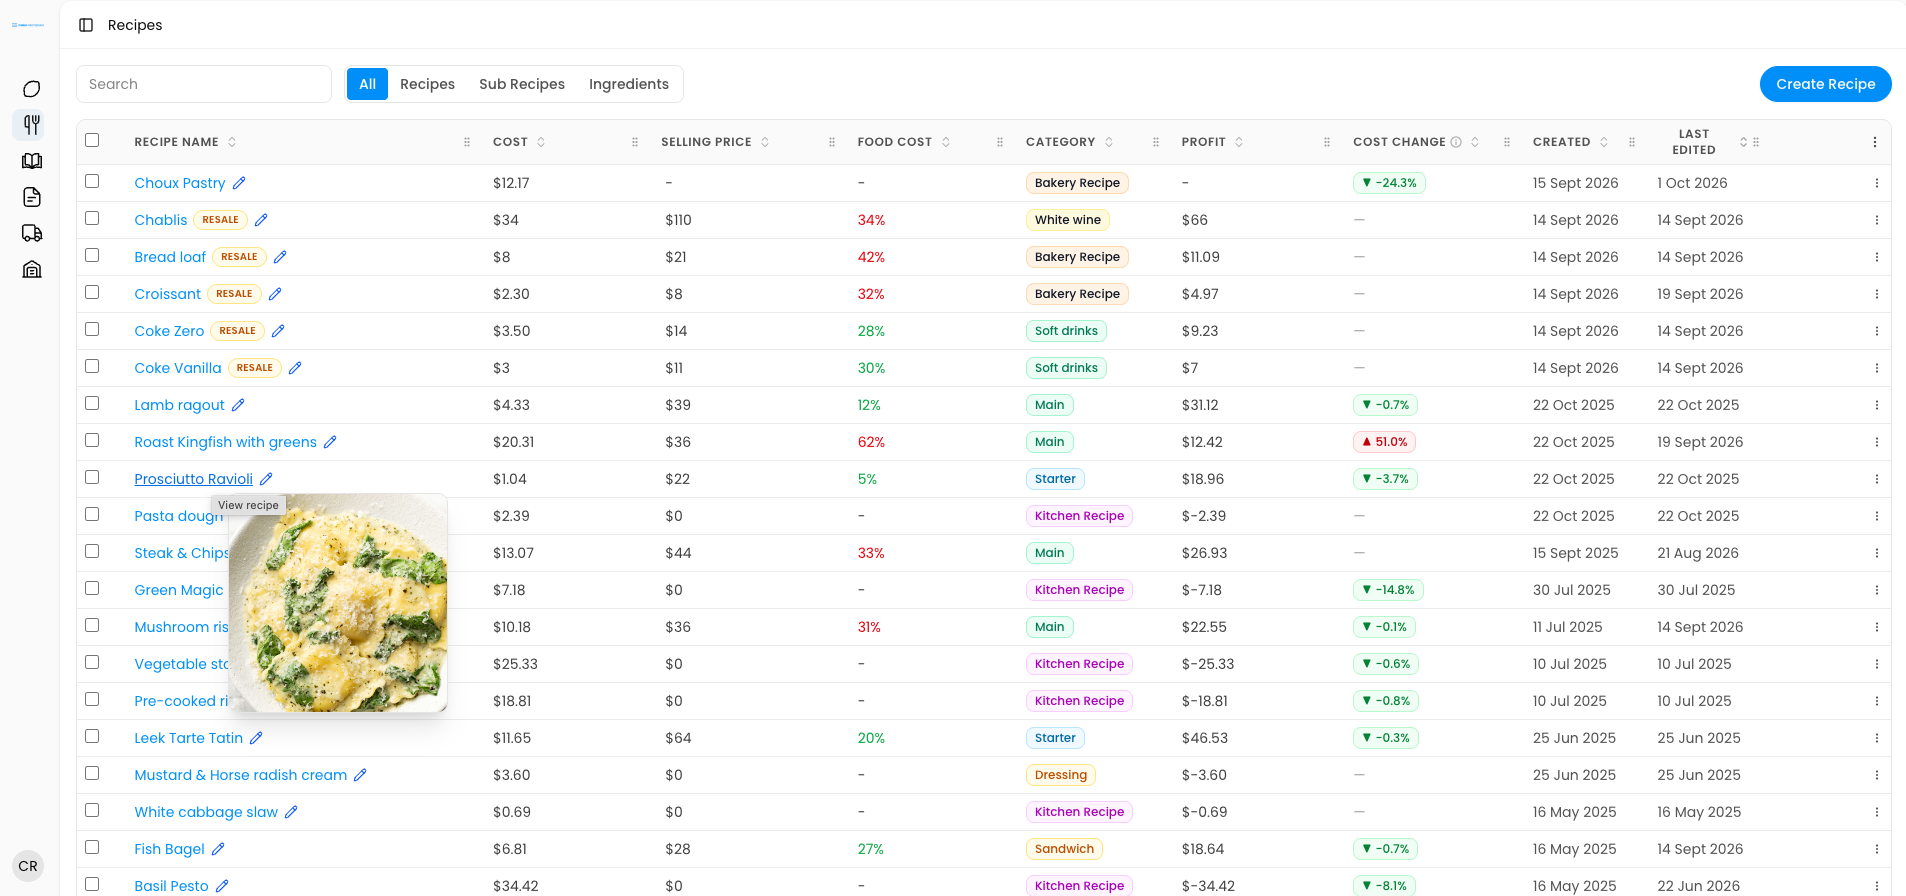
Customising your recipe dashboard
You can set up the dashboard to show exactly the information you care about.
1. Reorder your columns. Click and drag a column header to the left or right to move it where you want it.
2. Resize your columns. Drag the edge of a column to make it narrower or wider.
3. Choose which columns to show. Click the three dots on the right-hand side of the table, then select the columns you want visible, such as food cost, profit, cost change, category or last edited.
Choosing a dashboard view
The dashboard has four views, so you can focus on just the type of item you are looking for.
• All: every recipe, sub-recipe and sellable ingredient in one list.
• Recipes: dish recipes only, meaning recipes that do not have Batch Recipe ticked.
• Sub-recipes: batch recipes only, meaning recipes that do have Batch Recipe ticked.
• Ingredients: ingredients that you have marked as sellable.
Reading your recipe dashboard
• Food cost: shown in colour, based on the food cost target you set in your Settings. Green, orange or red tells you at a glance which recipes are on target and which need attention.
• Cost change: an arrow appears when an ingredient price change has affected a recipe’s cost. A red arrow pointing up means the food cost has gone up, and a green arrow pointing down means it has gone down. It uses the same fluctuation logic as your ingredients.
• Recipe photo preview: hover over a recipe’s name and a preview of its photo appears.
Editing a recipe from the dashboard
You do not always need to open a recipe to make a change.
• Edit the recipe: click the pencil icon next to the recipe.
• Change the selling price quickly: click straight into the selling price and type a new one. The price and the food cost update immediately. For example, changing the Lamb ragout from $45 to $52 shows you the new food cost right away.
Selecting and navigating your recipes
• Select a recipe: click the checkbox next to it. Select several recipes to delete or export them all at once.
• Select everything on the page: click the checkbox next to the column headers.
• Move between pages: use the page numbers at the bottom right.
• Check where you are: the bottom left shows the current range, for example Showing 1 to 20 of 77 recipes.
Next: Learn how to Scaling, printing, exporting, sharing a recipe
Scaling, printing, exporting, sharing a recipe
4 min read
Click any recipe in the dashboard and a pop-up opens showing all of its information, without letting you accidentally change anything. It is the quickest way to check a recipe, scale it, print it or share it.
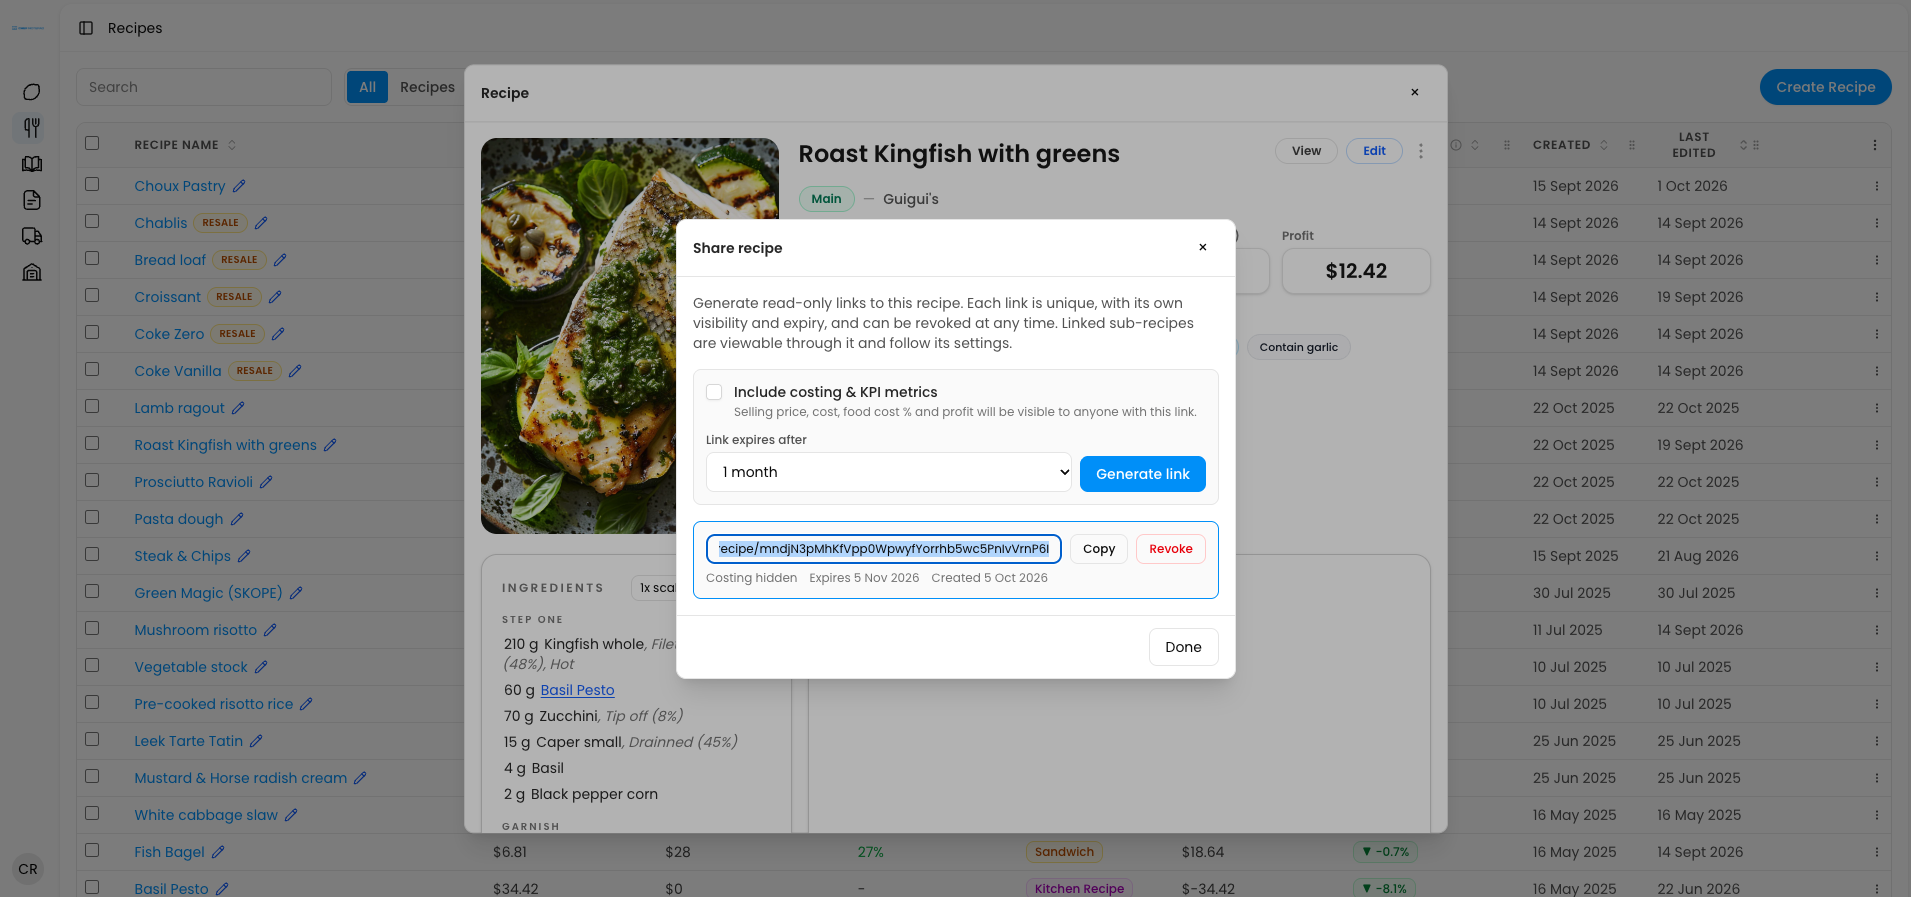
Scaling a recipe
Need to make more, or less, than the recipe is written for? Scaling updates every ingredient quantity for you. There are three ways to do it.
1. Change the number of serves. In the recipe mix field, type a new number of serves, for example from 4 to 10. Every ingredient quantity updates automatically.
2. Use the scale dropdown. Pick one of the presets: 2, 4, 6 or 8.
3. Scale from a single ingredient. Change one ingredient’s quantity manually, and the rest of the recipe scales proportionally around it. This is handy in the kitchen when you have a set amount of one ingredient and want to know how much of everything else you need.
Printing a recipe
Want to see how a recipe will look on paper before you print it? The view shows you the layout exactly as it will print.
1. Open the view. Click View to see the recipe as it would print.
2. Choose what to include. Tick or untick photo, ingredients, method and costing. If a printout is going up on the kitchen wall, you may want to untick costing so your margins stay private.
3. Choose a layout. Pick List for a smaller photo, with the recipe and its sub-recipes together, or One per page for a larger photo, with each recipe and sub-recipe on its own page.
4. Print. Click Print.
The recipe actions menu
Inside the pop-up, click the three dots to find these options.
• Print: opens the same view and layout options described above.
• Export as CSV: downloads the recipe as a CSV file.
• Share link: creates a link you can send to anyone, explained below.
• Edit: opens the recipe editor.
Sharing a recipe as a link
A shared link is a great way to keep everyone in the kitchen cooking from the same recipe, whether they are on the line, at another site, or at home.
1. Click Share link.
2. Choose what to include. Decide whether to show costing and KPI metrics.
3. Set an expiry. Choose 1 day, 1 week, 1 month, 1 year or never.
4. Generate and send. Click Generate link, then copy it and send it by email, text or WhatsApp.
Once the link is generated, its details are shown, for example Costing hidden, expires 5 November 2026, created 5 October 2026. You can revoke a link at any time, even if it was set to never expire.
Anyone with the link can view, scale, print and re-share the recipe, but they cannot edit it. The link is also live: if you change something later, say the amount of basil in a pesto, the shared recipe updates automatically, so nobody is working from an outdated version. That is what keeps your kitchen consistent and your communication clear.